BobsPlumbingVideos.com

Real Life Plumbing Advice for People Who Don't Want To Call A Plumber

  • Home
  • How-To-Fix Videos
    • General Plumbing
    • In The Kitchen
    • In The Bathroom
    • Toilet Repairs
    • Heating Problems
    • Hot Water Problems
  • Plumbing Articles
    • Quick Tips
    • Tool Reviews
    • Bobs Recommended Tools
  • About BPV
    • About Bob Sessa
    • Press Photos
    • Follow BobsPlumbingVideos.com
    • Find a Local Plumber – Coming Soon!
  • Got A Plumbing Problem? Ask Bob

How To Cut Out A Toilet Tank Bolt

July 24, 2016 By BobsPlumbingVideos Leave a Comment

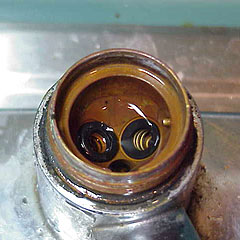
A YouTube viewer reached out to me after watching my video on installing a toilet tank onto a toilet bowl. He found out as most do that when removing an existing toilet tank to replace the bolts and a flush valve gasket, that they’re rusted in place and won’t budge. He sprayed them with WD-40 and every other lubricant he could think of but had no luck at all. He asked what the next step would be to cut out a toilet tank bolt? I replied “you have two choices, a. get a good old hacksaw blade and proceed to cut away by hand or b. if you’re experienced with power tools, a reciprocating saw will get the job done much quicker.
toilet tank bolt

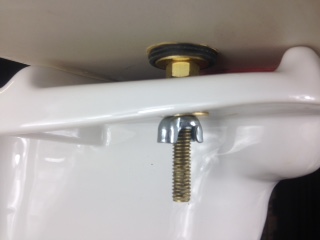
Most new close coupled tank to bowl kit combinations come supplied with all brass bolts, washers, nuts and or wing nuts which are easily removable should the need arise. Generally, at some point in the life of a toilet the flush valve gasket and or the gaskets under the bolts holding the tank to the bowl start to leak. Pretty simple fix to go out and get a new tank bolt and flush valve gasket kit, but most over the counter generic kits are often supplied with a brass bolt and all the remaining components are galvanized steel. If you’re not aware of it by now, the two dissimilar metals are not compatible. Soon after being installed the galvanized iron will start to rust in place a bond to the brass bolt making it difficult or impossible to remove.

I will get a call for service stating that their’s water and or a rust stain on either side of the floor directly in line where the tank bolts pass thru the toilet bowl. At that point, I’ll make a judgment call as to whether or not to attempt to unscrew the nut and bolt or to proceed and just cut them off. My first choice if I have the room and in an effort to save time will be my trusted Milwaukee SawZall. I have the skill and experience in using this method, but the fact is you don’t always have enough room to use this method. When that occurs, a good old hacksaw blade mounted in a blade handle (available in most home centers) always gets the job done. It may take a little longer, but with much less risk of damaging or cracking a tank with the power tool!

The key thing to remember is that if you’re faced with replacing the flush valve gasket and bolt kit, try to find all brass components so you won’t have to deal with the tedious process of cutting out the bolts in the future. If you don’t have the experience with power tools, I highly recommend using the hacksaw blade method. You can cause some serious damage using the power tool method. When I’m faced with an aftermarket replacement kit, I’ll just replace all the galvanized components with brass parts and I’m good to go. Take a look at the video below where I go over some options on how to cut out a toilet tank bolt, and if you have questions feel free to reach out to me. I’m always available by e-mail info@bobsplumbingvideos.com. I look forward to hearing from you.

Regards & Happy Plumbing,

Bob

Filed Under: How-To-Fix Videos Tagged With: close coupled bolt, close coupled toilet tank kit, tank to bowl bolt, toilet bolt, toilet tank, toilet tank bolt

My Delta Faucet Still Leaks!

July 11, 2016 By BobsPlumbingVideos Leave a Comment

I’m a big fan of Delta faucets and when that very first generation single lever faucet was introduced many moons ago I absolutely loved it. Well made, easy to repair and just an all around good product. A routine Delta repair would consist of a pair of springs, rubber seats, a new ball and you were good to go. Eventually, I would purchase complete repair kits which included all the previous parts mentioned plus all the “O” ring washers and a spray diverter if the faucet was so equipped.

delta guide imageThe original Deltas used a solid brass ball unlike the hollow stainless steel versions of today. In both cases the ball had a slot cut into it which would ride on a small brass guide located on the right side of the faucet interior.I would start to get service calls stating that the customer had to play with the handle and position it in exactly the proper spot in order to get the water to stop dripping. I thought this sounds a little flakey, but after taking a close look I figured out what was causing the problem.

The little brass protrusion or guide inside the faucet body would wear down and in some cases become virtually flush with the faucet body. The result being the ball lost its ability to be guided left to right for a positive shut-off. You would have to literally find a “sweet spot” for the handle in order for the water to stop running. I started to realize this would happen more often with the first generation Delta faucets which used the solid brass ball. Because it was one solid mass of brass, it eventually wore down the guide preventing the ball from making a positive shut-off.

If you find yourself having to get that handle in exactly the right position a.k.a “sweet spot” in order for the water to shut after you’ve replaced all the other parts inside the faucet, it’s time to take another look inside. If you find that the guide inside the faucet is pretty much worn down, you’re going to be faced with replacing the faucet. Check out the video below where I show you exactly what to look for. Don’t forget ! if you got questions, I got answers! Forward them to info@bobsplumbingvideos.com and as always,

Happy Plumbing.

Bob.

Filed Under: How-To-Fix Videos, In The Kitchen Tagged With: delta faucet, delta faucet repair, delta single faucet repair, delta single lever faucet repair, repair a leaky delta faucet, single lever faucet

When To Use a Plastic Ferrule

June 27, 2016 By BobsPlumbingVideos Leave a Comment

Back in the good old days coming up into the trade, every faucet or toilet I installed was with solid pipe. For faucets we would reduce the 1/2″ water supply lines to 1/4″ using reducing couplings and then we would choose from varying lengths of 1/4″ brass tailpieces to make the connection into the faucet. For toilets there was generally 3/8″ brass riser pipe which fit into the male shank of the toilet fill valve a.k.a. (ballcock). We would use the female nut supplied with the fill valve and make the connection using some ball wick.

Slowly the chrome plated copper basin and toilet supply tubes made their way into the market which frankly made life so much easier. I still use them today depending on job circumstances, but boy have times changed! Walk into any home center or plumbing supply house and ask for the parts to connect your toilet or faucet and you’ll more than likely get a flexible stainless steel supply tube. Hey that’s progress I guess and truth be told I’ll use them again depending on the job circumstances.

What I won’t use is those braided nylon water supply tubes I see all over the home centers. They are just one big accident waiting to happen and I’ve seen my fair share of them blow right out of their crimp points causing some serious water damage. DON’T USE THEM! . Enter the P.E.X. style water supply tube which to me is something a handyman might use (no offense guys) and truth is I would use them before using one of those braided plastic supply tubes.

The key in using the P.E.X. style supply tubes is to use the plastic ferrule that’s generally supplied with the tube. All to often I’ll come onto a job perhaps to install a new faucet and I discover the last guy used the metal brass ferrule designed to be use with the copper supply tubes. News Bulletin Friends! That metal ring will cut into the tube and maybe not cause a leak instantly but down the road someone is going to be the unfortunate victim of a leaking supply tube and it’ll most likely happen when they’re not home!

Take a look at the video and if you have any concerns or questions concerning P.E.X. style water supply tubes. I’d love to hear from you, I can always be reached at info@bobsplumbingvideos.com.

HAPPY PLUMBING,

Bob

Filed Under: How-To-Fix Videos, In The Kitchen Tagged With: brass ferrule, copper tubing, delta faucet repair, delta faucet repair one handle faucets, delta faucets, ferrule, how to connect faucets, leaking single lever faucet, P.E.X. supply tube, P.E.X. tubing, plastic ferrule, single lever faucet repair, water supply tube

Damaged Fitting? How To Seal It!

June 13, 2016 By BobsPlumbingVideos Leave a Comment

A youtube viewer left a comment about how he was trying to remove the brass spud end of an old radiator valve from his cast iron radiator. He stated that while cutting through the brass spud, he cut into the female threads of the radiator. Now he has a damaged fitting and is concerned that he ruined the radiator and isn’t happy about the thought of having to replace it.

I outline that process in my video “How To Cut Off A Steam Valve“ part two. When I’m removing a brass spud from a steam radiator my tool of choice is a Lenox close quarter saw. My second choice would be a good old hacksaw blade which will also get the job done. I personally think that you’re less likely to damage things when you cut by hand.

That being said I know many plumbers like to use their electric or battery operated reciprocating saw which admittedly is quick, but unless you’re experienced in using the tool you can damage fittings and radiators in a flash. Don’t get me wrong, we work in crazy some positions and sometimes even with hand tools I’ve cut into fittings and radiators alike.So when you do compromise a fitting, what do you do?

Well long before Teflon tape came around I used a good old bulletproof spool of lamp-wick.It’s basically a cotton based thread that you wrap in a clockwise direction in between the threads of a piece of pipe or a male radiator spud. Similar to how you would apply Teflon Tape, only it sits down in between the threads and builds as you make multiple passes. But the icing on the cake is a joint sealing compound called Blue Block which if left to set for 24 hrs. will form a leak proof seal and save you the grief of having to remove or replace a fitting.

Hercules manufacturers Blue Block in addition to a product called Grip. Either one will do the trick, but be warned! Wear gloves and be super careful not to get it on your clothes or tools. Lacquer thinner is the only thing that will get it off. So for those of you who find yourself in the unfortunate position of cutting too deep into a fitting or radiator, fear not! Lamp-wick and Blue Block to the rescue. Sure you cut so deep into a fitting that it may have to be replaced, but I would certainly check out my video first.

If you still have a question or special circumstances, I can always be reached at info@bobsplumbingvideos.com. Regards and HAPPY PLUMBING!

Bob

Filed Under: General Plumbing, How-To-Fix Videos Tagged With: damaged fitting, damaged fittings, damaged pipe, damaged radiator, damaged threads, worn threads

Which Toilet Gasket Should You Use?

June 5, 2016 By BobsPlumbingVideos Leave a Comment

Good Question, I think? For this old timer, the good old fashion 100% virgin wax seal has been and still is the most popular way to set a toilet bowl today. That being said, there are new products coming into the market each and every day. Today I’d like to briefly introduce you to two of them which are becoming ever more popular among the do it yourself community.

fluidmaseter gasketFirst up is The Fluidmaster “Better Than Wax” universal toilet seal. This wax-free toilet gasket fits most toilets and is easily re-positionable without the fuss of dealing with wax which can be somewhat messy if you have to re-position the bowl.The company says that once in place, it will create a very tight and effective seal that will resist the effects of average toilet plunging.

It’s made of a somewhat semi-hard rubber material that in my opinion will work just fine if you have a relatively level floor. If the floor is severely out of level and you find yourself having to shim the bowl in order for it to sit straight, this might not be the right choice. Next up is the Sani Seal waxless toilet seal.

The Sani Seal gasket is made of a very flexible polyurethane foam that is re-positionable, sani-seal gasketantimicrobial and functions no matter what the temperature, providing an easy trouble free installation. They both will position the toilet bolts in such a way that you literally can’t miss when setting a toilet bowl. Because the Sani Seal gasket extremely flexible, I think it would be the best choice if your floor is not exactly level.

I personally have not used either of them and that’s not to say they aren’t a reliable replacement for a good old fashion wax gasket. Wax can tend to get messy if you don’t know what you’re doing, so if getting wax all over yourself is something that doesn’t appeal to you, either of these two choices will work for you. If cost is a concern, consider this. A wax gasket will cost you a buck or two, the Fluidmaster gasket will set you back nine or ten bucks and finally the Sani Seal gasket will set you back twelve to fourteen bucks.

I give you my take on both of these products in the video below, so why not take a look for yourself and tell me what you think and if in fact you’ve used either of these products. If you have any questions at all, I can always be reached at info@bobsplumbingvideos.com. I look forward to your questions.

Best Regards and HAPPY PLUMBING!

Bob

Filed Under: How-To-Fix Videos, In The Bathroom Tagged With: re-setting a toilet, setting a toilet bowl, toilet gasket. wax seal, toilet installation, toilet removal, toilet seal, toilet wax, wax gasket

  • « Previous Page
  • 1
  • 2
  • 3
  • 4
  • 5
  • 6
  • …
  • 18
  • Next Page »

Voted 3rd Most Popular Site

Connect With Me

facebook twitter google plus youtube

Discover How To Fix The 7 Most Common Home Plumbing Problems Even If You've Never Picked Up A Wrench!

Simply Enter Your First Name & Email Address To Get Instant Access Now!

We will not sell, rent, give away your information. We hate spam too!

Recent Posts

  • Clogged Drain / D.I.Y.
  • Master Plumbers Exam / Practical Test
  • Bathtub Drain Stopper / Trip Waste Assembly

Categories

Like Us On Facebook

Like Us On Facebook

Newsletter · Ask Bob · Privacy Policy · Terms · Sitemap

Copyright © 2026 BobsPlumbingVideos.com · All Rights Reserved · Web Design & Marketing by Urmil Patel