BobsPlumbingVideos.com

Real Life Plumbing Advice for People Who Don't Want To Call A Plumber

  • Home
  • How-To-Fix Videos
    • General Plumbing
    • In The Kitchen
    • In The Bathroom
    • Toilet Repairs
    • Heating Problems
    • Hot Water Problems
  • Plumbing Articles
    • Quick Tips
    • Tool Reviews
    • Bobs Recommended Tools
  • About BPV
    • About Bob Sessa
    • Press Photos
    • Follow BobsPlumbingVideos.com
    • Find a Local Plumber – Coming Soon!
  • Got A Plumbing Problem? Ask Bob

Multi Tool Blades / Oscillating Tool Blades

March 27, 2018 By BobsPlumbingVideos Leave a Comment

 Multi-Tool Blades?

So I’ve owned my first edition Fein multimaster tool for quite a few years now and I remember the first time I had to purchase replacement multi-tool blades for it. STICKER SHOCK to say the least and truth be told I didn’t think they were that great. I later came to the realization I was expecting more from them than they were designed to do. (more on that later).

I started looking for a less expensive multi-tool blade alternative and over the years, tried several aftermarket brands. None of them were as good a quality as the originals, but for the price I paid they got the job done.

I was recently on Amazon scrolling thru the tools (my toy store) and came across a company that manufacturers replacement blades for multi tools. They had over two hundred positive reviews about their blades so I had to check them out.

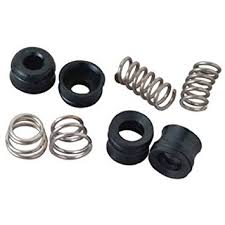
I contacted the company and they were very gracious in that they sent me two of their most popular multi-tool blade assortment kits. Before I move on please know that I did not pay for these blades and agreed to produce the below video after trying them out. I received two kits, a 15 piece multi tool saw blade set which consisted of three pieces each of five different blades. And a 10 piece bi-metal saw blade set all which consisted of one style blade.

I tried each of the blades out on different materials such as 1/4″ plywood, 1″ X 3″ stock, 2″ X 4″ stock, 3/4″ p.v.c. and 1 1/2″ p.v.c. pipe, light gauge angle steel and finally 3/8″ threaded rod. I thought across the board they performed well but did find that the 10 piece bi-metal struggled a bit on the 3/8″ threaded rod.

Don’t get me wrong, it made the cut but on threaded rod I’d probably use my hacksaw or sawzall. All in all for the the price point of these blades I thought they provided a a good value for a fraction of what the original Fein blades cost.

Speaking of multi-tool blades or even tools for that matter, I see all to often that young apprentices and even seasoned tradespeople (myself included) often like to push the boundaries of what the blade or tool was designed to do. As a result they’ll give the equipment an unwarranted “bad review” which in my opinion is not fair. It’s often the operator that’s at fault so please keep that in mind when shopping for blades or tools in general. Buy the right tool for the right job!

I invite you to check out the video below and please stay tuned for brand new content from bobsplumbingvideos.com. I know I haven’t posted in quite some time, but that’s about to change for the better. I left links above for you to check out If you’d like to try these blades out for yourself.


Stay Well & Happy Plumbing!

Bob


Filed Under: How-To-Fix Videos, Tool Reviews Tagged With: bosch oscillating tool, dewalt oscillating multi-tool, dremel tool, fein, fein multi-tool, makita multi-tool, multi-tool blades, oscillating multi-tool, oscillating tool, oscillating tool blades

I Need Your Help!

April 1, 2017 By BobsPlumbingVideos Leave a Comment

It’s March 31, 2017, and the last video I posted to my youtube channel was on Feb 25th. I’m sitting here in my office with a totally blank slate. So rather than racking my brains out trying to decide what content to create, I’m going to ask my subscribers. I need your HELP! What Videos would you like me to post?

After 40 years in the service business, I lose sight of the fact that my daily adventures don’t seem all that important to me. But I’m probably missing the fact that what comes second nature to me, may be of great interest and really valuable to you. So again I ask, what Plumbing Videos / Basic Plumbing Repairs do you want me to create?

Help!

Do you really want to see major plumbing alterations and repairs? Are you more interested in the materials, tools or the techniques to get a job done? Plumbing repair covers a very wide range of tasks ranging from very simple fixes to very elaborate and beyond.

Below I’ve created a simple survey and would appreciate your participation! Simply check off the content you would like me to create more of !

The fact is if you’re a homeowner you’ll most likely be faced with having to call in a plumber at some point. My goal here at BobsPlumbingVideos.Com is to educate homeowners like yourself about the art of residential plumbing repair and in the process help you save your hard earned dollars for basic plumbing repairs.

My equipment is set up and ready to start filming my next video so, please send me your ideas, your thoughts, and suggestions on how I can help keep the plumber out of your life! Regards, and HAPPY PLUMBING!

Bob

Filed Under: Bobs Recommended Tools, General Plumbing, Heating Problems, Hot Water Problems, How-To-Fix Videos, In The Bathroom, In The Kitchen, Plumbing Articles, Q & A, Quick Tips, Toilet Repairs, Tool Reviews

Septic Tank, Septic Tank Replacement, New Sewer Installation

February 25, 2017 By BobsPlumbingVideos Leave a Comment

When I bought my home back in 1977, they were equipped with 1000 gallon steel septic tanks and cement cesspools a.k.a. leaching pits which distribute the liquid overflow from the septic tank.

The builder told us that the city would be installing city sewers within the next five years and all would be great. Well at the time they said steel septic tanks had a 20 to 25-year life span.

Well, here I am, 40 years later at the tail end of a two-year project to install city sewers in my sub-division. I’ve been very fortunate in that I’ve really never had any major issues with my septic tank over the years.

I attribute that to regular treatments of a live bacteria enzyme along with good luck. Every one of my neighbors experienced many problems with their systems over the years and in some cases had to have their septic tanks replaced or at minimum pumped on a regular basis.

By regular I mean every three months or so, the normal time interval for a pumping would be a year. The problem is that everyone including myself had their washing machines emptying into their septic tanks which in the septic world is the kiss of death!

When the soap from the washing machine cools down, it solidifies causing the holes in the leaching pit to clog and allowing the water to back into the septic tank and then into the house. Not a very pretty sight! Eventually, everyone started to divert the washing machine waste in some creative ways.

Some had dry wells installed in their backyards while others ran a 3″ piece of p.v.c. pipe under their front lawns and out thru the curb into the street. It wasn’t legal but it did solve the septic tanks from prematurely backing up into your house.

I was ahead of the curve because I was performing regular enzyme treatments which kept a check on the soap build up, but as my system got beyond the 20-year mark, I ended up having to install a dry well or be faced with quarterly pumpings which would run anywhere from $110-&125.00. Ouch!

Well, it’s now February 2017 and everyone in the subdivision is hiring their own contractors to come and abandon their septic tanks and leaching pits and connect to the city sewers. The city brings the connection to the curb in front of your home and it’s your responsibility to bring the new sewer line out to their connection.

Like I mentioned this has been going on for the past two years, and at this point in time, I figure it’s time to jump on the bandwagon, count my blessings and kiss my septic tank goodbye. And that’s what the video below is all about, I tried my best not to get in the way of the contractor doing the work as they thought I was nuts for filming this thing.

Well, I hope you enjoy the show and if you have any questions about this or any other of my videos I can always be reached at info@bobsplumbingvideos.com. I’m going to take a good long hot shower!

Happy Plumbing,

Bob

Filed Under: How-To-Fix Videos

Delta Faucets, Delta Repairs, Delta Faucet Tool

January 29, 2017 By BobsPlumbingVideos Leave a Comment

Delta Faucets and Delta Repairs are some of the most popular videos on You-Tube. I posted three of them, two for their single lever faucets and one for their two handled faucets. In both cases, the removal of the cartridges, ball, seats and springs is necessary for a proper re-build.

As far back as I can remember I’ve used a thin blade screwdriver, dental pick or even a long needle nose pliers to remove those pesky seats and springs which sometimes can be a pain in the butt to remove. Especially the hot water side, those rubber seats get hard as a rock and literally, break into pieces when trying to remove them.

For the most part getting them out is a relatively straight-forward task, but installing the new ones can be tricky at times. You have to drop the springs into a small recess inside the faucet followed by the rubber seat which also has to sit over the spring and into the recess. Often if there’s water sitting in the faucet, the rubber seat ends up floating up and out of the recess.

A good tip is to remove all the sitting water via a sponge or straw so this problem is avoided.I usually, will thread the rubber seat followed by the spring onto a thin blade screwdriver and use it as a guide to lower them into the recess inside the faucet. This has been the way I’ve been doing it ever since I can recall, but recently I found this tool in one of my supplier’s catalogs called a Purge-N-Set tool for seats and springs.

Needless to say, besides being a tool geek and curious I had to order one and check it out. Well, I’m happy to say it works really well and for those of you who are having trouble removing and re-installing seats and springs in your Delta faucets, you might want to check it out. You can purchase a Purge-N-Set tool at few online retailers and if you want to see it in action check out the video below where I demonstrate just how it performs.

As always if you have any questions on Delta faucet repairs, you can e-mail me at info@bobsplumbingvideos.com. You’ll also find me on Face-Book, Twitter.

Happy Plumbing,
Bob

P.S. – I bought this tool from Wolverine Brass which only sells to professional plumbers. My cost $14.95, I’ve seen them online selling for as much as $28.00 plus in which case I would say to you the good old fashion thin blade screwdriver trick works just fine!

Filed Under: How-To-Fix Videos, In The Kitchen, Tool Reviews Tagged With: delta faucet, delta faucet repair, delta faucet seat and spring removal, delta faucet tool, delta single lever faucet, delta spring and seat installation, delta spring and seat removal tool, delta two handled faucet, leaking delta faucet

What Is Water Hammer and Why Your Pipes Bang

December 31, 2016 By BobsPlumbingVideos Leave a Comment

What is Water Hammer and why does it happen? Simply put, it’s a pressure surge or wave that takes place when a liquid is forced to either stop or change direction suddenly. Kinda like driving your car into a brick wall…Ouch! This sudden stop can and does cause noise and or damage which is usually identified as a loud Bang throughout the plumbing system.

WHY THIS HAPPENS

This can happen in many ways such as when shutting off a faucet abruptly, a quick closing toilet refill valve, a commercial toilet flushometer. But one of the most common culprits and cause of Water Hammer is your washing machine. Washing Machines come equipped with very fast closing electronic valves and the higher your incoming water pressure the higher the risk of noise and damage to your plumbing system.

WHAT CAN HAPPEN?

This sudden pressure surge will cause unsecured pipes to vibrate severely and depending on the material and how old the plumbing system even break causing thousands in water damage. The higher the incoming water pressure the more likely you’ll experiencewater-hammer 
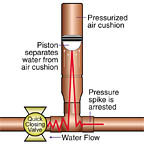
Water Hammer. Most plumbing codes require the use of water hammer arresters be plumbed into the plumbing system either individually or for a bank of plumbing fixtures.

Water Hammer arresters can be fabricated in the field by simply taking a piece of pipe approximately 18″-24″ inches in length and capping one end. That piece of pipe would be installed into a tee connection above where a fixture supply would stub out of a wall. When the system is filled with water, that piece of pipe would become half filled with air thus creating a cushion to take up the shock of the water.

WHAT YOU CAN DO

Depending on where in the home and the severity of the Water Hammer, arresters can be placed in several locations to help eliminate this annoying and potentially disastrous condition from happening. As mentioned previously one of the most common causes of Water Hammer is the washing machine. Depending on how the washing machine supply lines are plumbed it could be an expensive plumbing job to install arresters on the individual hot and cold water supply pipes.

Enter Sioux-Chief which is a manufacturer of plumbing specialties found in plumbing supply houses and big box stores around the country. They have made it easy to add Water Hammer arrestors to any washing machine without a major plumbing alteration. The Sioux Chief 660-H mini-rester gets the job done quickly and efficiently and in the video below, I show you how you can Do It Yourself save a couple of bucks and prevent a potential disaster!

HAPPY PLUMBING!

Bob

Filed Under: How-To-Fix Videos Tagged With: 660-hb, arrestor, best water hammer arrester, best water hammer arrestor, hammer arrester, sioux chief mini rester, sioux chief water hammer arrester, soiux-chief 660-HB, stop water hammer, water hammer, water hammer arrester, water pipe hammer arrester, water shock arrester

  • « Previous Page
  • 1
  • 2
  • 3
  • 4
  • …
  • 18
  • Next Page »

Voted 3rd Most Popular Site

Connect With Me

facebook twitter google plus youtube

Discover How To Fix The 7 Most Common Home Plumbing Problems Even If You've Never Picked Up A Wrench!

Simply Enter Your First Name & Email Address To Get Instant Access Now!

We will not sell, rent, give away your information. We hate spam too!

Recent Posts

  • Clogged Drain / D.I.Y.
  • Master Plumbers Exam / Practical Test
  • Bathtub Drain Stopper / Trip Waste Assembly

Categories

Like Us On Facebook

Like Us On Facebook

Newsletter · Ask Bob · Privacy Policy · Terms · Sitemap

Copyright © 2026 BobsPlumbingVideos.com · All Rights Reserved · Web Design & Marketing by Urmil Patel