BobsPlumbingVideos.com

Real Life Plumbing Advice for People Who Don't Want To Call A Plumber

  • Home
  • How-To-Fix Videos
    • General Plumbing
    • In The Kitchen
    • In The Bathroom
    • Toilet Repairs
    • Heating Problems
    • Hot Water Problems
  • Plumbing Articles
    • Quick Tips
    • Tool Reviews
    • Bobs Recommended Tools
  • About BPV
    • About Bob Sessa
    • Press Photos
    • Follow BobsPlumbingVideos.com
    • Find a Local Plumber – Coming Soon!
  • Got A Plumbing Problem? Ask Bob
You are here: Home

Threaded Pipe Sealant, Which One To Use?

October 1, 2016 By BobsPlumbingVideos Leave a Comment

A YouTube viewer reached out to me this past week and made a request That I do a video on threaded pipe sealant.bluetapepipes2 
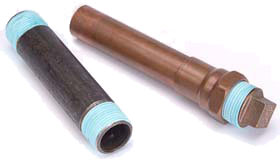
I guess to me pipe threaded sealant is not such a glamorous subject but after a little research, it looks like people want to know this stuff! So I shot the video to give you my thoughts on the subject.

A lot of folks ask the question “do I need to use threaded pipe sealant, what kind should I use or should I use Teflon tape”? Generally speaking I would say it depends on the job circumstances, personal preference, and what you have available at the time. First, let’s talk about pipe threads. Pipe threads are made using a pipe stock & die just like the one in the video below.

They’re tapered by design and as you make up the pipe into a fitting it gets tighter the further in it goes. Tightening is always in a clockwise direction and loosening in a counter-clockwise direction. In a perfect world and a perfect set of cutting dies you should be able to make up a fitting onto a piece of pipe and it shouldn’t leak. But in the real world, there are microscopic imperfections in pipe threads that can’t be seen by the human eye.

Enter “threaded pipe sealant”. To me, the number one reason to use it is to lubricate the male
threads of a piece of pipe which will aid in the tightening process and seal any small inconsistencies in the pipe threads. How tight is tight enough? Well that’s accomplished through feel and years of practice. The fact is you can over tighten a piece of pipe which will cause the female fitting to overly expand (brass pipe in particular) causing to the joint to fail.

The threaded pipe sealants of today have come a long way since I started as a young apprentice. Back then I used a petroleum based product called “pro dope” made by the company Hercules along with a spool of plumbers wick. I would wind the wick in between the male threads, follow it up with an application of “pro dope” and I was good to go.

They still make “pro dope” and I think they’ve even made it more environmentally friendly. Fast forward to the introduction of Teflon Tape and PTFE paste thread sealants, we have many more choices in deciding which one is the best application for the job. I for one generally use a combination of Teflon Tape and PTFE pipe thread sealant on most of the everyday job’s I perform. But that could change at a moments notice.

Which one I use in a specific situation is all going to depend on the job circumstances. If I’m working on pipe that’s in good condition, I’ll use one method. If I’m working on really old questionable plumbing, I’ll use another method or a combination of two or three of the products available. I demonstrate all my techniques in the video below, so why not take a look and tell me what you think. With all the products available on the market, I can see how you might get confused. Hopefully, I cleared up some of that confusion and as usual, if you have questions, please reach out to me at info@bobsplumbingvideos.com.

Best Regards,

Bob

Filed Under: General Plumbing, How-To-Fix Videos Tagged With: blue block, grip, hercules, lampwick, plumbers tape, plumbers wick, ptft, ptft sealant, teflon pipe sealant, teflon tape

Dishwasher Air-Gaps…Do You need One?

September 18, 2016 By BobsPlumbingVideos Leave a Comment

Dishwasher air-gaps are required devises in many states across the country and the best way to ensure you’re code compliant is to check with your local buildings department. Here in N.Y.C we have the option to use an air-gap or simply create a high loop in the dishwasher drain hose and secure it as high as possible under the sink base cabinet. I’ve been using the second option as described and honestly can say I’ve yet to see a counter top mounted air-gap in my everyday plumbing practice.dishwasher-air-gap

So what is the purpose of the dishwasher air-gap? It’s to prevent dirty contaminated sink drain water from backing into your dishwasher thus creating a potentially hazardous health issue. Not only is it unhealthy, but the stagnant water pooled at the bottom of dishwasher absolutely STINKS!. When I’m called in to address a leak under a sink, nine times out of ten I’ll find the dishwasher drain hose draped on the floor of the base cabinet and connected to either the garbage disposal or directly into a tailpiece.

What this does is allow drain water to migrate from the sink drain into the dishwasher and the homeowner has no clue it’s happening. They then open the dishwasher door and discover some nasty smelling water, especially if they don’t use the dishwasher that often. It’ll happen more frequently if the kitchen sink drain is partially clogged and draining slowly. The simple fix is to a. make sure the sink is draining properly and b. elevate the drain hose as high as possible and secure it to the underside of the counter top or cabinet wall. And if your state requires, the installation of a proper sink / counter mounted air-gap.

If a blockage takes place in the discharge hose between the air-gap and or tailpiece the sink mounted device will discharge water alerting you of a problem. You would be better served mounting it to the sink itself as opposed to a counter top, but each individual job will dictate what the best approach will be. If it does become clogged, you could remove the decorative cap and using the tube from a roll of paper towels attempt to blow free the blockage. On the other hand if it’s clogged with some hard food particles, you’re probably going to have to dismantle the waste hose under the sink to address the issue.

The point is dishwasher air-gaps are use to prevent hazardous sink water from getting into your dishwasher and contaminating dishes, utensils, etc. Check out the video below where I explain in detail why you need a dishwasher air-gap and an alternative option if your state does not require one. As always feel from to contact me at info@bobsplumbingvideos.com, stay well and HAPPY PLUMBING!

Best Regards,
BOB

Filed Under: How-To-Fix Videos, In The Kitchen Tagged With: air-gap, air-gaps, discharge hose, dishwasher, dishwasher air-gap, dishwasher drain, dishwasher hose, dishwasher loop, diswasher drain

How to Cut Off A Toilet Tank Handle

August 7, 2016 By BobsPlumbingVideos Leave a Comment

This post on “How To Cut Off A Toilet Tank Handle” is going to be a short one, as I agree with that old saying “a picture is worth a thousand words”. In this case, it’s the video below which will unlock my trade secrets. Moving on, we all should know by now that when tightening pipe, fittings, nuts, bolts etc, it’s clockwise to tighten and counter clockwise to loosen or remove. The simplest way to remember this is that popular phrase “righty tighty / lefty loosey”.

But “stop the clock”, when we’re talking about toilet tank levers, that old phrase goes out the window! You see manufacturers figured out a long time ago that by constantly flushing your toilet, the handle would eventually become loose. So enter the reverse thread in which you would tighten to the left and loosen or remove to the right, thus keeping the tank lever from eventually flopping around.

Many older vintage toilet tank levers were made of a cheap white metal composite which would eventually fuse to the threads of the handle making it impossible to remove. Keep tightening in the wrong direction and you’re guaranteed to crack the toilet tank! When that happens the only solution is to cut it off or run the risk of replacing your toilet, especially if you’re not aware of the reverse threads.

Most homeowners aren’t aware and that’s exactly why I made this video “How To Cut Off A Toilet Tank Handle”. So why not check out the video and leave your comments, I would love to know what you think. Remember “righty tighty / lefty loosey” does not apply! As always, you can e-mail your questions to me at info@bobsplumbingvideos.com.

Best Regards & Happy Plumbing!

Bob

Filed Under: In The Bathroom, Toilet Repairs Tagged With: how to cut off a tank handle, how to cut off a tank lever, tank handle, tank lever, toilet lever

How To Cut Out A Toilet Tank Bolt

July 24, 2016 By BobsPlumbingVideos Leave a Comment

A YouTube viewer reached out to me after watching my video on installing a toilet tank onto a toilet bowl. He found out as most do that when removing an existing toilet tank to replace the bolts and a flush valve gasket, that they’re rusted in place and won’t budge. He sprayed them with WD-40 and every other lubricant he could think of but had no luck at all. He asked what the next step would be to cut out a toilet tank bolt? I replied “you have two choices, a. get a good old hacksaw blade and proceed to cut away by hand or b. if you’re experienced with power tools, a reciprocating saw will get the job done much quicker.
toilet tank bolt

Most new close coupled tank to bowl kit combinations come supplied with all brass bolts, washers, nuts and or wing nuts which are easily removable should the need arise. Generally, at some point in the life of a toilet the flush valve gasket and or the gaskets under the bolts holding the tank to the bowl start to leak. Pretty simple fix to go out and get a new tank bolt and flush valve gasket kit, but most over the counter generic kits are often supplied with a brass bolt and all the remaining components are galvanized steel. If you’re not aware of it by now, the two dissimilar metals are not compatible. Soon after being installed the galvanized iron will start to rust in place a bond to the brass bolt making it difficult or impossible to remove.

I will get a call for service stating that their’s water and or a rust stain on either side of the floor directly in line where the tank bolts pass thru the toilet bowl. At that point, I’ll make a judgment call as to whether or not to attempt to unscrew the nut and bolt or to proceed and just cut them off. My first choice if I have the room and in an effort to save time will be my trusted Milwaukee SawZall. I have the skill and experience in using this method, but the fact is you don’t always have enough room to use this method. When that occurs, a good old hacksaw blade mounted in a blade handle (available in most home centers) always gets the job done. It may take a little longer, but with much less risk of damaging or cracking a tank with the power tool!

The key thing to remember is that if you’re faced with replacing the flush valve gasket and bolt kit, try to find all brass components so you won’t have to deal with the tedious process of cutting out the bolts in the future. If you don’t have the experience with power tools, I highly recommend using the hacksaw blade method. You can cause some serious damage using the power tool method. When I’m faced with an aftermarket replacement kit, I’ll just replace all the galvanized components with brass parts and I’m good to go. Take a look at the video below where I go over some options on how to cut out a toilet tank bolt, and if you have questions feel free to reach out to me. I’m always available by e-mail info@bobsplumbingvideos.com. I look forward to hearing from you.

Regards & Happy Plumbing,

Bob

Filed Under: How-To-Fix Videos Tagged With: close coupled bolt, close coupled toilet tank kit, tank to bowl bolt, toilet bolt, toilet tank, toilet tank bolt

My Delta Faucet Still Leaks!

July 11, 2016 By BobsPlumbingVideos Leave a Comment

I’m a big fan of Delta faucets and when that very first generation single lever faucet was introduced many moons ago I absolutely loved it. Well made, easy to repair and just an all around good product. A routine Delta repair would consist of a pair of springs, rubber seats, a new ball and you were good to go. Eventually, I would purchase complete repair kits which included all the previous parts mentioned plus all the “O” ring washers and a spray diverter if the faucet was so equipped.

delta guide imageThe original Deltas used a solid brass ball unlike the hollow stainless steel versions of today. In both cases the ball had a slot cut into it which would ride on a small brass guide located on the right side of the faucet interior.I would start to get service calls stating that the customer had to play with the handle and position it in exactly the proper spot in order to get the water to stop dripping. I thought this sounds a little flakey, but after taking a close look I figured out what was causing the problem.

The little brass protrusion or guide inside the faucet body would wear down and in some cases become virtually flush with the faucet body. The result being the ball lost its ability to be guided left to right for a positive shut-off. You would have to literally find a “sweet spot” for the handle in order for the water to stop running. I started to realize this would happen more often with the first generation Delta faucets which used the solid brass ball. Because it was one solid mass of brass, it eventually wore down the guide preventing the ball from making a positive shut-off.

If you find yourself having to get that handle in exactly the right position a.k.a “sweet spot” in order for the water to shut after you’ve replaced all the other parts inside the faucet, it’s time to take another look inside. If you find that the guide inside the faucet is pretty much worn down, you’re going to be faced with replacing the faucet. Check out the video below where I show you exactly what to look for. Don’t forget ! if you got questions, I got answers! Forward them to info@bobsplumbingvideos.com and as always,

Happy Plumbing.

Bob.

Filed Under: How-To-Fix Videos, In The Kitchen Tagged With: delta faucet, delta faucet repair, delta single faucet repair, delta single lever faucet repair, repair a leaky delta faucet, single lever faucet

  • « Previous Page
  • 1
  • 2
  • 3
  • 4
  • 5
  • 6
  • …
  • 22
  • Next Page »

Voted 3rd Most Popular Site

Connect With Me

facebook twitter google plus youtube

Discover How To Fix The 7 Most Common Home Plumbing Problems Even If You've Never Picked Up A Wrench!

Simply Enter Your First Name & Email Address To Get Instant Access Now!

We will not sell, rent, give away your information. We hate spam too!

Recent Posts

  • Clogged Drain / D.I.Y.
  • Master Plumbers Exam / Practical Test
  • Bathtub Drain Stopper / Trip Waste Assembly

Categories

Like Us On Facebook

Like Us On Facebook

Newsletter · Ask Bob · Privacy Policy · Terms · Sitemap

Copyright © 2026 BobsPlumbingVideos.com · All Rights Reserved · Web Design & Marketing by Urmil Patel