BobsPlumbingVideos.com

Real Life Plumbing Advice for People Who Don't Want To Call A Plumber

  • Home
  • How-To-Fix Videos
    • General Plumbing
    • In The Kitchen
    • In The Bathroom
    • Toilet Repairs
    • Heating Problems
    • Hot Water Problems
  • Plumbing Articles
    • Quick Tips
    • Tool Reviews
    • Bobs Recommended Tools
  • About BPV
    • About Bob Sessa
    • Press Photos
    • Follow BobsPlumbingVideos.com
    • Find a Local Plumber – Coming Soon!
  • Got A Plumbing Problem? Ask Bob

Water Pipe Leak Repair / Joining Copper & Lead Pipe

November 13, 2016 By BobsPlumbingVideos Leave a Comment

So I get a call for a water pipe leak repair coming from the ceiling of a basement in an area called Sunset Park in Brooklyn, New York. When I get to the job and head on down the basement to see what’s going on, I’m in total disbelief. I haven’t seen this much lead water pipe in a residential application for over 30 years.

The leak was coming down an interior air shaft that acted as a pipe chase for all the waste and water lines going up to the second and third-floor apartments. A brass hot water pipe was smack up against the cold water lead riser pipe and from years of expansion and contraction created a pin hole.

Now a water pipe leak repair like this was going to be a challenge for a couple oflead-pipe-image 
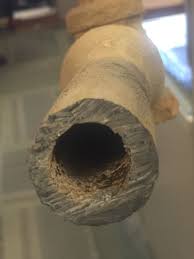
reasons. I needed access which I fortunately, was able to get via the first-floor bathroom. I had to do it standing in a bathtub working thru a double hung window which looked right into air-shaft. Second reason is I was a little shaky about using a torch in the shaft out of fear of dropping it and setting the place on fire.

Finally, I called several local supply houses to find and old fashioned lead dresser coupling so I wouldn’t have to use a flame and they all pretty much laughed at me and said “you gotta be kidding”! Plan “B” was to try a 3/4″ shark bite fitting which did fit over the 5/8″ outer diameter of the 1/2″ lead pipe and although it did clip on firmly, it was slightly big for the “O” ring to hold water.

So I no choice but to go into my bag of tricks and make the connection between the new copper pipe and old lead by soldering the two together the way it was done back in the good old days. Question was, did I still have what it takes? Well, I’d better have my shit together or this customer was going to be left with a major re-pipe which by the way he wasn’t planning on. My technique was a little rusty but kind of like riding a bike “you really don’t forget”, it just takes a little practice to get back into the swing of things.

Well, I hope you enjoy my attempt at the long lost art of lead wiping and even though it wasn’t a perfect joint (I’ve done much better), it’s water tight and that’s all that counts! By the way, I was so close to my Go-Pro 4 silver edition camera that I wasn’t paying attention to the fact that my joint was running a little hot and I probably used more solder than I should have. Never the less I got the job done and I hope you enjoy the video!

HAPPY PLUMBING,
Bob

Filed Under: How-To-Fix Videos Tagged With: copper pipe, copper pipe repair, lead pipe, lead pipe repair, leaking copper pipe, leaking lead pipe, leaking water pipe, water pipe, water pipe leak, water pipe leak repair

How To Solder Copper Tubing part 2

November 19, 2013 By BobsPlumbingVideos Leave a Comment

Here’s part 2 of how to solder copper tubing. 

If you haven’t seen part 1, check it out here: How to solder copper tubing – part 1

In part 1 I took you through preparation process and laid out the necessary tools and supplies for your soldering journey. In this video I demonstrate how to solder one horizontal and one vertical joint using 1/2″ copper tubing. As a rule on the smaller diameters (1/2″ & 3/4″) I’ll leave my torch tip on one area of the fitting and because I’m using Mapp fuel along with my Turbo Torch STK-1 tip the job gets done fast. One step often missed in the the soldering process is not reaming or d-burring the inside of the copper pipe. This step you don’t want to miss as it will cause turbulence resulting in noisy plumbing.When I solder I always heat the fitting which will insure that the solder will flow freely into the joint. Their seems to be many opinions on whether you should heat the pipe or fitting, but I was taught this way at an early age and to date it’s my opinion that heating the fitting will insure a leak free joint 100% of the time.

One other very important step I want to point out is that when your through soldering and the joint sets, it’s important to grab a damp cloth and wipe off all that excess flux. Did you ever see a nicely laid out series of water lines that were lined up perfectly both horizontally and vertically but was covered in crusty green gunk? Horrible! That’s the left over flux someone forgot to wipe off.  The soldering process is not to difficult to do and if you take it slowly, you should have no problem with it.

If you didn’t watch part 1, I recommend you check it out first. 

Remember you can always reach me at info@bobsplumbingvideos.com if you have any further questions.

HAPPY PLUMBING!

Filed Under: General Plumbing, How-To-Fix Videos Tagged With: copper pipe, copper tubing, how to solder copper pipes, how to solder copper tubing, solder, soldering

How to Solder Copper Tubing – Part 1

November 19, 2013 By BobsPlumbingVideos Leave a Comment

Watch and learn how to solder copper tubing in this easy to follow video.

Their are several videos on you-tube showing how to solder copper tubing ; some good, some bad and some in-between. In this two part series I lay out the tools, cleaning procedure and steps to take when soldering small diameter ( 3/4″ & 1/2″) copper tubing. I will do a video on larger diameter copper, but in this series we’re going to concentrate on the small stuff.

I want to point out that I prefer to use Mapp fuel as opposed to propane fuel only because it burns at much higher temperatures getting the job done faster. In combination with the Turbo-Torch regulator and STK-1 torch tip featured in the video, the job goes quite quick on the small sizes and saves time on the larger sized copper tubing. You may certainly use a basic torch tip along with propane fuel, the job will just take a bit longer to complete. The key in a good strong joint is the cleaning and preparation process. I clean both the outside of the tubing as well as inside the fitting and depending on how dirty, I’ll use a scotch bright pad or plumbers emery cloth. The next step is to liberally coat the pipe and fitting with flux hopefully using a flux brush, (you don’t want to do this with your finger, flux is nasty). Their are differing opinions on what to heat first (the pipe, the fitting) but since I started in the business I was always taught to heat the fitting. By heating the fitting a process called capillary attraction takes place whereby the heat from you torch will actually draw the solder into the fitting with minimal effort.

The first part of this video series is all about the tools and preparation, in part two I’ll demonstrate a horizontal and vertical joint using 1/2″ copper tubing. This is not that difficult to do, so when you’re done with part 1, jump on over to part 2 and let’s solder a couple of joints.

Here’s a quick link to How To Solder Copper Tubing – Part 2

HAPPY PLUMBING!


Filed Under: General Plumbing, How-To-Fix Videos Tagged With: copper pipe, copper tubing, how to solder copper pipes, how to solder copper tubing, solder, soldering

Voted 3rd Most Popular Site

Connect With Me

facebook twitter google plus youtube

Discover How To Fix The 7 Most Common Home Plumbing Problems Even If You've Never Picked Up A Wrench!

Simply Enter Your First Name & Email Address To Get Instant Access Now!

We will not sell, rent, give away your information. We hate spam too!

Recent Posts

  • Clogged Drain / D.I.Y.
  • Master Plumbers Exam / Practical Test
  • Bathtub Drain Stopper / Trip Waste Assembly

Categories

Like Us On Facebook

Like Us On Facebook

Newsletter · Ask Bob · Privacy Policy · Terms · Sitemap

Copyright © 2026 BobsPlumbingVideos.com · All Rights Reserved · Web Design & Marketing by Urmil Patel