BobsPlumbingVideos.com

Real Life Plumbing Advice for People Who Don't Want To Call A Plumber

  • Home
  • How-To-Fix Videos
    • General Plumbing
    • In The Kitchen
    • In The Bathroom
    • Toilet Repairs
    • Heating Problems
    • Hot Water Problems
  • Plumbing Articles
    • Quick Tips
    • Tool Reviews
    • Bobs Recommended Tools
  • About BPV
    • About Bob Sessa
    • Press Photos
    • Follow BobsPlumbingVideos.com
    • Find a Local Plumber – Coming Soon!
  • Got A Plumbing Problem? Ask Bob

Screw,Solder,Push or Press Fittings?

May 30, 2016 By BobsPlumbingVideos Leave a Comment

Should you use screw pipe, soldered joints, push fittings or press fitting technology? Good question with some good choices, so what should you choose? Well from my perspective I will generally try to match what already exists on the job. The majority of homes I work in features screw pipe a.k.a. i.p.s (iron pipe size) which is typically brass pipe. When making small repairs whether inside or outside of the wall I carry an assortment of brass fittings and pipe nipples from 1″ to 6″ in length in half inch increments. If I have to make a larger repair which goes beyond that 6″ threshold I will transition to copper pipe and fittings. Why? plain and simply it would be cost prohibitive to purchase, cut, thread and install brass pipe in today’s world.

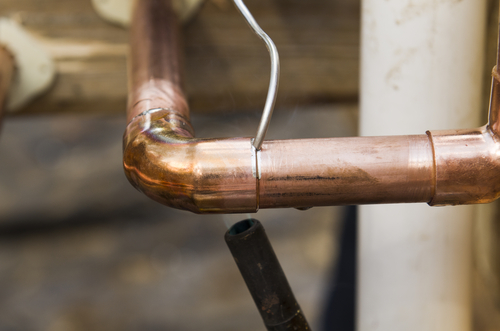
When copper become the material of choice over brass pipe I thought there goes the skill required to fabricate a properly working water distribution system but in order to stay competitive the marketplace we had to make that transition. The soldered joint has been a widely accepted method of joining copper pipe for decades and does require a fair amount of skill to be done correctly. Just when you thought skill was back in demand, enter the Push Fitting! UGH! The most popular name associated with push fittings is Shark-Bite. You simply cut, prepare and then push the pipe into the fitting which is held in place by a series of stainless steel teeth that lock onto the pipe. The watertight seal is made by a single “O” ring washer and if you need to disassemble the joint, you can do so by using a removal tool provided by the manufacturer.

copper pipe imageI’m not particularly a fan of Shark-Bite fittings but will admit that I do carry a few couplings and caps in 1/2″ and 3/4″ sizes to make emergency repairs until I can make a permanent repair with a soldered joint. There are several manufacturers who make removable push fittings and they all share the same methods in assembling and removing the pipe. Thankfully at present in New York City we are not permitted to use removable mechanical connectors, and hopefully, they’ll write that into the plumbing code permanently. It’s only my opinion, but I just don’t like them. We are however allowed to use non-removable push fittings made by a few manufacturers and once the pipe is pushed into the fitting, that’s it! The joint is permanent and if you make a mistake, you have to start over again. A little more skill required!

Next is Press Technology which is becoming increasingly more popular especially if you’re performing larger scale renovations. Although the cost of a press fitting is typically four to five times more than the cost of a traditional copper sweat fitting, the savings in labor (no cleaning, fluxing, heating or solder) far outweighs the price difference. You’ll have to make and investment in the Press Tool to the tune of about $2000.00 plus depending on model and manufacturer, but if you’re cranking out a large amount renovation work, you’ll make that investment back in no time. The joint is formed by preparing the pipe which is inserted into the press fitting and then with the appropriately sized set if jaws clamped around the fitting, you pull the trigger and in about seven seconds you have a leak-free joint.

I personally have not invested in the tool because the majority of the work I perform is service and repair work and I can’t justify the expense for the tool or the fittings at this time, but that could change in the future. So in this video, I go over the pros and cons of all of these connecting methods
and hopefully, bring some new light to those of you wondering which one is right for you. And if you enjoy this video I would appreciate you heading on over to You-Tube and give me a thumbs up and also SUBSCRIBE to my channel.

Regards and HAPPY PLUMBING…Bob

Filed Under: General Plumbing, How-To-Fix Videos Tagged With: brass pipe, copper fitting, copper tubing, press fitting, push fitting, screw pipe, shark-bite, sweat fitting

Frost Proof SillCock? Maybe!

May 23, 2016 By BobsPlumbingVideos Leave a Comment

IMG_2417So everyone is intrigued with the frost proof sillcock, WHY?  I know,I know, I’m just a grumpy old time plumber who’s not open to the new modern way of doing things. That’s somewhat true, but the fact still remains if these frost proof valves are not installed correctly, you still run the risk of  BURST water line due to a FREEZE UP. How? Well, the bottom line is this. If you don’t pitch them downward away from the water source, the water will remain inside the cavity and at the first sub-freezing temperatures will cause them to fail! I’ve been installing outside hose lines longer than I care to remember and  I’ve been doing it successfully without using expensive frost proof sill-cocks. I guess there is a place for them to be used in commercial applications,but for the average homeowner, I don’t think you need them.

The key to installing an outside hose line is this, Install a good quality ball type shut-off valve inside the house just before the water line exits the home and  pitch them downward away from the waters source. When winter time rolls around, shut off the ball valve and open the outside faucet to drain out the remaining water inside the line. Pretty simple! But wait, what if the line is pitched backward towards the water source? It happens all the time here in New York City and when it does I simply install another hose bib inside the home to drain the water out of the line. Again when winter time rolls around I shut off the inside ball valve and open both the inside and out hose bib’s ensuring there is no more water sitting in the line.

An aid in helping the water drain successfully out of the line is to use a shut-off valve with a side inlet air vent port which will relieve any vacuum. I personally don’t use them, but they are available should you want them. The key to successfully preventing an outside hose line from an annual freeze up is to  shut them off in the first place! I get called in every year from the same customers who simply forgot to shut off the water supply to their outside hose lines and I even equip them with BIG ORANGE GLOW TAGS with the words SHUT IN WINTER! Go figure! 

I was called in this past week because a customer  had a leak coming thru his foundation wall from his frost proof sillcock. He didn’t shut off the inside water supply valveIMG_2416 because he thought he was protected with his fancy frost-proof valve. What he didn’t realize was that the washer inside the valve failed and the entire valve was back pitched which allowed water to fill the valve cavity. Upon the first freezing temperatures, the valve body split open leaking water through the foundation wall into his basement.

Check out the video where I show you the exact valve I pulled out of his house and believe it or not he wanted an exact replacement! I reminded him he would be well advised to shut-off the inside water supply valve to prevent this from happening again. By the way, I tagged the valve, you think he’ll read it?  Anyway thanks as always for stopping by and  if you enjoy my videos please give me a thumbs up and subscribe to my channel. Regards, HAPPY PLUMBING. Bob 

Filed Under: General Plumbing, How-To-Fix Videos Tagged With: frost-proof, frostproof hosebob, frostproof hydrant, hosebib, hydrant, outside hosebib, outside hydrant, sillcock

Replacing a Bathtub Nozzle

May 23, 2016 By BobsPlumbingVideos Leave a Comment

Not very exciting Right? Well, exciting or not you may find yourself in a situation where you might have to, so I shot this short video to help you out! So I’ll get a call stating their’s water leaking down below their bathroom in line with the bathtub. My first question is usually, does it leak continually or only when you use the tub? Most times it’s the latter which indicates they have a drain pipe issue and isn’t as urgent because if they don’t use it, there is no leak.

If they tell me it leaks continually that indicates to me they have a water pipe leak and I’d better get over there a.s.a.p. What often happens is when I enter the bathroom, I’ll notice that the tub/shower valve is leaking into the bathtub. Now I’m saying to myself this could be a drain pipe leak but until I stop the faucet from leaking I really won’t be able to tell.

I repair the faucet and stop it from leaking, fill up the tub several times and let it drain off. NO LEAK? What’s going on? At this point, I get on my knees and take a peek under the tub nozzle and notice that it’s partially corroded underneath so I turn on the tub/shower valve and observe. What I see is the water streaming along the bottom of the nozzle toward the tile wall. About 10 minutes later I’ll see the leak showing in the ceiling below.

I remove the tub nozzle and notice that there is a huge void around the pipe that exits the wall and discover that the water is simply rolling back along the bottom of the nozzle and right back into the wall. A little silicone caulk or tile grout would have solved this problem, but the fact is in real life I find this situation all the time. The solution! Replace that corroded tub nozzle and thoroughly seal the void between the pipe exiting the wall with a high-quality silicone seal.

Back in the day, most of the pipes that accepted tub nozzles were I.P.S (iron pipe size) or screw type. You simply measured for the proper length nipple to exit the wall and screw on a new tub nozzle. Today we have a few more options and in this video, I’ll go over them and show you how to replace a tub nozzle in your home. So stick around, check out this video and if you have questions, please reach out to me at info@bobsplumbingvideos.com.

Happy Plumbing,
Bob

Filed Under: How-To-Fix Videos Tagged With: bathtub repair, install a bathtub nozzle, replace a bathtub nozzle, shower faucet repair, tub faucet repair

The No Brainer Home Plumbing Inspection Checklist. (NBHPIC)

December 11, 2015 By BobsPlumbingVideos Leave a Comment

If you’re new to BobsPlumbingVideos.com, you must be saying hey this guy hasn’t published any new content since march 2015. What’s up with that? Well, you would be correct so please let me explain. If you’re not aware, in addition to publishing “how to” plumbing videos I also own and operate my own one man plumbing company Robert Sessa Plumbing. A scaled-down version of the original plumbing company I founded in 1978 and sold to my employees in 2004.

shutterstock_148975631So while shooting videos is something I love to do, I’m often out in the field performing plumbing work for people just like you. But that’s not the only reason I’ve fallen behind on my video production. In my everyday plumbing practice I make my best effort to convince my customers to allow me to perform preventive maintenance at least once annually. This accomplishes two things, a. I locate small issues before they turn into plumbing disasters, b. I save them a boat load of money in doing so.

Now I must tell you that most homeowners don’t see the value preventive maintenance, they’ll say things like “I don’t have a problem” I’ll worry about it when it breaks! That’s ridiculous! But for the ones that let me do my thing for them every year, they have the peace of mind knowing that if there are issues brewing, I’ll find them and correct the problem before it gets out of hand. Now this annual inspection is a walk thru visual inspection of all the exposed plumbing in a typical one-family home. It includes the bathrooms, kitchens, laundry room, the water and waste system and finally the water heater.

If this is my very first inspection in a customer’s home, I always locate multiple problems they weren’t even aware of. The result, they save a boat load of money by avoiding a potential emergency. So I said to myself, what if I could record a series of videos to show homeowners the value in preventive maintenance and walk them thru the exact procedure I use when performing these inspections.Not only will they save money by locating small problems before they go bad, but they’ll also save the cost of the annual inspection which is a $300.00 value. The No Brainer Home Plumbing Inspection Checklist was born!

So I set out on a mission to create this video series which is a combination of a keynote presentation, video demonstrations, screencast demonstrations and PDF’s. Between the all four along with the editing required to put it all together, it’s taken me just about eight months to produce (hey I’m Plumber, not a videographer). So my regular video production has taken a back seat. Oh and yes all the while trying to operate my small little one-man plumbing business. Well, the No Brainer Home Plumbing Inspection Checklist is finally complete and as a matter of fact I’m currently running a series of Face-Book ads whereby you can download the five module video series for FREE before it goes on sale. All I’m asking in return is for your honest review and testimonial of the product.

flooded.lounge.12.08.2015I would love for 20 of you to download and give me your honest opinion, review and or critique of the No Brainer Home Plumbing Inspection Checklist before I launch it for sale. As my way of saying thanks, you’ll automatically gain access into my private facebook group and also receive lifetime updates as I refine the process. All you need to do is e-mail me privately and enter into the subject line “NBHPIC” and I’ll forward you a link where you can gain access to all five modules. As of this writing, I haven’t set a selling price for the “NBHPIC” but I can tell you this. You won’t spend $300.00 to have me come out to your home and perform this inspection. Heck, you won’t even spend $100 for the five video modules! The “NBHPIC” will cost you less than a weeks worth of your favorite latte’s from those fancy coffee boutiques.

Well there you have it, that’s what I’ve been up to and now it”s time to start cranking out some more valuable content so you can keep the plumber out of your life! Up next a look into my personal tool bag. A lot of you have been asking about the tools I carry on a daily basis, so I recorded the video and show you exactly what I lug around day in and day out. I also give you my thoughts on what you as a homeowner should have on hand if you want to do you own minor plumbing repairs. I call it Bob’s Basic Tools or (BBT) for short. I look forward to hearing your review of the “NBHPIC” and until next time, HAPPY PLUMBING!

Filed Under: How-To-Fix Videos, Plumbing Articles Tagged With: bobs plumbing videos, checklist, inspection, plumbing

Re-Building a Globe Valve

February 2, 2015 By BobsPlumbingVideos Leave a Comment

At the request of a you-tube viewer I decided to shoot this short video on how to re-build a globe style shut-off valve. These valves which are found in almost every home use a typical bib washer which seal up against a smooth surface called the seat. If the seat is in sound condition you can usually replace the rubber washer and the valve would be operational again. If however the seat is pitted, cut or nicked etc. it would have to be replaced. Unlike full port valves (ball valves) these are restrictive to the water flow because the water would enter through bottom of one side up past the seat and then out. In general most shut-off valves sit their until their needed and then first person to come along and use them, causes them to leak from somewhere.

If you choose to repair rather than replace a globe valve make sure the seat of the valve is in sound shape or your efforts will be futile. Trust me, been their done that! If it’s been in service for a numbers of years I can almost guarantee that the screw that holds the washer in place will break. If that happens you have no choice but to drill it out and re-tap it to accept a new brass bib screw. If you get lucky you may be able to knock the broken screw piece through into a hollow cavity in the valve. If not, go get your drill! It’s also good practice to replace all the packing inside the packing nut and the gasket around the stem that screws into the body of the valve. Back in the day I used graphite packing which works very well, but today I see more and more Teflon rope being used Either will work just fine.

When installing stem back into the valve body, make sure it’s in the fully open position or you’ll risk damaging the washer and stem or both. You also should pay attention to where the washer sits to make sure it’s sitting inside the little recessed cup. If that recess is corroded or missing, I strongly suggest trying to find the little brass cups to place the washer before screwing it back into the stem. Without that cup the washer will just spread out beyond the valve stem and eventually fail. If your motivated and have the room, my choice would be to replace the globe valve with the 1/4 turn ball valve. On the other hand if you find it’s to difficult to replace then by all means go ahead and rebuild.

It’s not difficult and if you should run into a problem you can always reach me at info@bobsplumbingvideos.com.

Also be sure to subscribe to my newsletter for money saving tip’s and receive my free series- “The Seven Things You Shouldn’t Pay a Plumber Plumber To Do”.

Until next time…
HAPPY PLUMBING!

Filed Under: How-To-Fix Videos Tagged With: globe valve, globe valve repair, valve repair, water valve repair

  • « Previous Page
  • 1
  • …
  • 3
  • 4
  • 5
  • 6
  • 7
  • …
  • 18
  • Next Page »

Voted 3rd Most Popular Site

Connect With Me

facebook twitter google plus youtube

Discover How To Fix The 7 Most Common Home Plumbing Problems Even If You've Never Picked Up A Wrench!

Simply Enter Your First Name & Email Address To Get Instant Access Now!

We will not sell, rent, give away your information. We hate spam too!

Recent Posts

  • Clogged Drain / D.I.Y.
  • Master Plumbers Exam / Practical Test
  • Bathtub Drain Stopper / Trip Waste Assembly

Categories

Like Us On Facebook

Like Us On Facebook

Newsletter · Ask Bob · Privacy Policy · Terms · Sitemap

Copyright © 2026 BobsPlumbingVideos.com · All Rights Reserved · Web Design & Marketing by Urmil Patel